Free-Body Diagrams
Classical mechanics assumes that the object under investigation can be isolated from its environment by constructing a free-body diagram. This analytical tool is fundamental to solving mechanical problems, providing a systematic method for identifying and analyzing all forces acting on an object.
The Concept
In drawing a free-body diagram, all natural attachments and influences of the environment are replaced by equivalent forces acting on the body (the object of interest).
The process:
- Identify the object of interest (the “body”)
- Conceptually separate it from everything it touches
- Replace each connection with the force it exerts
- Replace environmental effects (gravity, air resistance) with equivalent forces
- Draw the isolated body with all forces shown as vectors
This isolation allows application of Newton’s laws to predict motion.
Example: Car on a Road
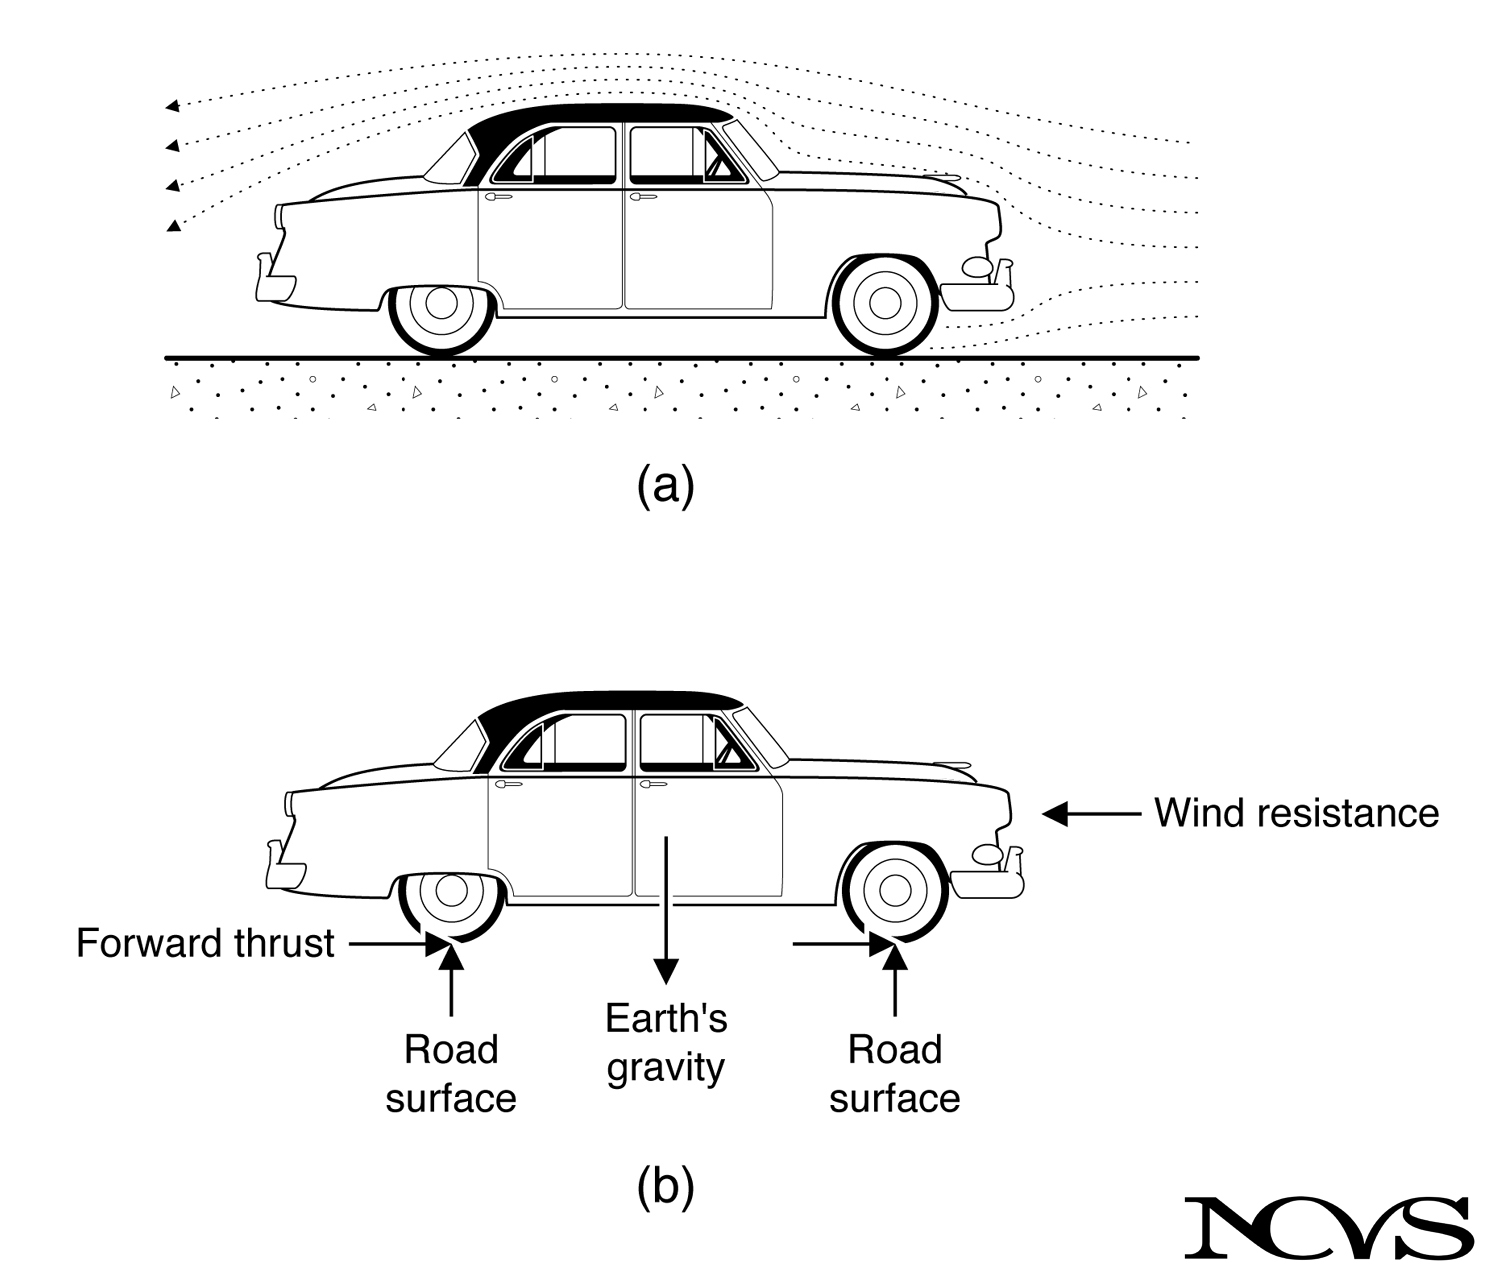 Figure 2.1: (a) Car on a road; (b) Free-body diagram showing all forces acting on the isolated car.
The Physical Situation (Figure 2.1a)
A car moves along a road. Multiple interactions occur:
- Tires contact road surface
- Air surrounds the car
- Earth’s gravity pulls on the car
- Engine generates thrust transmitted through tires
The Free-Body Diagram (Figure 2.1b)
To analyze the car’s motion, we systematically replace each interaction:
1. Road Surface → Reactive Forces
- The road is “separated” from the automobile
- Replaced by an equivalent force (or set of forces)
- Normal force perpendicular to road surface
- Friction force parallel to road surface (thrust from tires)
2. Atmosphere → Wind Resistance
- The atmosphere is “removed”
- Replaced by an equivalent wind resistance force
- Acts opposite to direction of motion
3. Tire Thrust → Road Reaction
- The thrust of the car is replaced by the reactive force of the road against the tire
- Newton’s third law: road pushes car forward with same force car pushes backward on road
4. Earth → Gravitational Force
- The body of the earth is removed
- Replaced by gravitational force of attraction
- Acts between center of earth and center of car
- Points downward with magnitude mg (mass times gravitational acceleration)
Applying Newton’s Laws
Given the complete set of forces on the object (Figure 2.1b), motion can be predicted from Newton’s laws:
- Components of forces are summed in each of three directions (x, y, z)
- The net force in each direction determines the acceleration in that direction
- Apply Newton’s second law: f = ma in each direction
In the x-direction (forward):
- Net force = Forward thrust - Wind resistance
- This determines forward/backward acceleration
In the y-direction (upward):
- Net force = Road normal force - Gravitational force
- Usually equals zero (no vertical acceleration)
- Road force balances weight
In the z-direction (sideways):
- Net force = Any sideways forces (turning, wind)
- Determines lateral acceleration
Voice Science Application: Vocal Fold Vibration
Consider a small volume of vocal fold tissue during vibration:
Physical Situation
The tissue volume interacts with:
- Adjacent tissue above
- Adjacent tissue below
- Adjacent tissue medially (toward midline)
- Adjacent tissue laterally (toward exterior)
- Air pressure on medial surface
- Blood pressure internally
Free-Body Diagram Construction
Step 1: Isolate the Volume
- Draw boundaries of the tissue volume
- Consider it separated from surroundings
Step 2: Replace Connections with Forces
- Elastic forces: From stretched tissue fibers connecting to adjacent regions
- Viscous forces: From relative motion between this volume and neighbors
- Aerodynamic force: From air pressure acting on exposed surface
- Inertial force: From mass times acceleration (d’Alembert’s principle)
Step 3: Apply Newton’s Second Law The net force in each direction determines acceleration:
- Lateral direction: Determines opening/closing motion
- Vertical direction: Determines vertical phase difference (mucosal wave)
- Longitudinal direction: Determines length changes
General Procedure
1. Define the System
- What object or region are you analyzing?
- What are its boundaries?
2. Identify All Interactions
- What does the object touch?
- What fields act on it (gravity, electromagnetic)?
- What fluids surround it?
3. Replace Interactions with Forces
- Contact forces (normal, friction, tension)
- Body forces (gravity, buoyancy)
- Aerodynamic forces (pressure, drag)
- Elastic forces (springs, stretched tissue)
4. Draw the Diagram
- Show object as simple shape
- Draw force vectors with clear labels
- Indicate direction and point of application
- Choose coordinate system
5. Apply Newton’s Laws
- Sum forces in each direction
- Set equal to mass times acceleration in that direction
- Solve for unknown quantities (forces or motion)
Advantages of Free-Body Diagrams
Systematic Approach:
- Ensures no forces are overlooked
- Organizes complex problems
- Makes assumptions explicit
Clear Communication:
- Visual representation of force analysis
- Standard method recognized across disciplines
- Facilitates discussion and review
Problem-Solving Tool:
- Transforms physical situation into mathematical equations
- Identifies which forces are important
- Reveals when problem is over- or under-determined
Common Mistakes to Avoid
1. Including Non-Forces
- Don’t show mass, velocity, or acceleration as forces
- These are properties of the object, not forces on it
2. Showing Internal Forces
- Only show forces external to the defined system
- Internal forces cancel by Newton’s third law
3. Forgetting Reaction Forces
- Every contact produces a force
- Don’t overlook normal forces, especially
4. Inconsistent Directions
- Establish coordinate system clearly
- Maintain sign convention throughout
5. Over-Simplification
- Don’t ignore significant forces
- But also don’t overcomplicate needlessly
- Judgment comes with experience
Summary
Free-body diagrams provide a systematic method for analyzing mechanical problems by isolating the object of interest and replacing all environmental interactions with equivalent forces. This powerful tool enables application of Newton’s laws to predict motion.
For voice science, free-body analysis can be applied at various scales:
- Whole larynx (gross movement)
- Individual muscles (force generation)
- Tissue volumes (vibration dynamics)
- Air parcels (aerodynamic flow)
Constructing accurate free-body diagrams requires:
- Clear definition of the system boundary
- Systematic identification of all interactions
- Proper representation of forces as vectors
- Consistent application of coordinate systems
While simple in principle, free-body analysis becomes more challenging with complex geometries and multiple interacting components—characteristics typical of biological systems like the larynx.
Key Takeaways
- ✅ Free-body diagrams isolate objects by replacing attachments with equivalent forces
- ✅ All environmental interactions must be replaced: contacts, fields, and fluids
- ✅ Forces are summed in each direction to apply Newton’s second law
- ✅ Systematic approach ensures no forces are overlooked in complex situations
- ✅ Can be applied at multiple scales in voice science: whole larynx, tissue volumes, or air parcels
- ✅ Clear system definition and consistent coordinate systems are essential
Related Topics
Further Reading
- Halliday, D., & Resnick, R. (1988). Fundamentals of physics. New York: Wiley.
- Hirano, M., Matsuo, K., Kakita, Y., Kawasaki, H., & Kurita, S. (1983). Vibratory behavior versus the structure of the vocal fold. In I. R. Titze & R. C. Scherer (Eds.), Vocal fold physiology: Biomechanics, acoustics and phonatory control (pp. 26-40). Denver: Denver Center for the Performing Arts.